


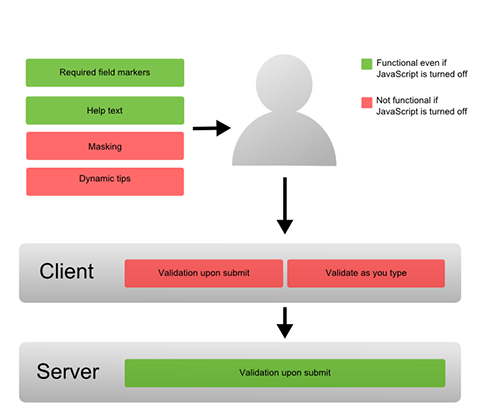
There are two good reasons to use client side validation:
- It’s a fast form of validation: if something’s wrong, the alarm is triggered upon submission of the form.
- You can safely display only one error at a time and focus on the wrong field, to help ensure that the user correctly fills in all the details you need.
Two Major Validation Approaches
The two key approaches to client-side form validation are:
- Display the errors one by one, focusing on the offending field
- Display all errors simultaneously, server side validation style

While
displaying all errors simultaneously is required for server side
validation, the better method for validation on the client-side is to
show one error at a time. This makes it possible to highlight only the
field that has been incorrectly completed, which in turn makes revising
and successfully submitting the form much easier for the visitor. If you
present users with all errors at the same time, most people will try to
remember and correct them at once, instead of attempting to re-submit
after each correction.

HTML 5 Validation
HTML 5 has a new attribute named required attribute and ActiveModel::Validators lets us easily know what kind of validations are defined on our models.
So, I came up with another new feature combining these two technologies.
Now, when creating a form with a model which has validates_presence_of field,
ruby

class User < ActiveRecord::Base

  validates_presence_of :name

end
ruby
<%= form_for User.new do |f| %>
<%= f.text_field :name %>
<%= f.submit %>
<% end %>
the required="required" attribute are automagically injected into the generated input field.
html

<input id="user_name" name="user[name]" required="required" size="30" type="text" />
This enables seamless client side validation without any extra JavaScript coding.
There are a few more attributes in HTML5 that are similar to required
and would map nicely onto Rails model validators. Among them are
min/max for input type number and range. There is also a pattern
attribute which is simply a regular expression.

It used to be (and often times, still is) that when a user submitted a
form in a web application, the entire page would be submitted to the
server where it would be validated. Then, the form would either be
re-rendered with user-friendly error messages; or, the user would be
forwarded on to a "success" page. With the explosive growth of
JavaScript and DOM (Document Object Model) manipulation libraries,
however, we now see many web applications using both client side
validation for an improved user experience and server side validation
for security concerns. While this shift towards the client-side leads to
a richer, more responsive user interface (UI), it is also changing the
shape of server side validation. This latter change, while invisible to
the end-user, has significant benefits waiting to be embraced by the
developer.
Before there was JavaScript and AJAX (Asynchronous JavaScript and
XML), developers had to rely on the server-side code to do all of the
form processing, data validation, and page rendering. As such, the
server-side code was tightly bound to the user experience. This
limitation required the server-side code to be written in a way that
resulted in the best user experience.
To see what I'm talking about, take a look at the following code that demonstrates a server-side-only approach to validation:
=================================================
<!--- Param the form values. --->
<cfparam name="form.name" type="string" default="" />
<cfparam name="form.email" type="string" default="" />
<cfparam name="form.birthday" type="string" default="" />
<!--- Create a collection of form validation errors. --->
<cfset errors = [] />
<!--- Validate the name. --->
<cfif !len( form.name )>
<cfset arrayAppend( errors, "Please enter your name." ) />
</cfif>
<!--- Validate the email. --->
<cfif !isValid( "email", form.email )>
<cfset arrayAppend( errors, "Please enter a valid email." ) />
</cfif>
<!--- Validate the birthday. --->
<cfif !isNumericDate( form.birthday )>
<cfset arrayAppend( errors, "Please enter a valid birthday." ) />
</cfif>
<!---
Check to see if any errors were found during form
validation - if so, we'll have to pass them back to
the user.
--->
<cfif !arrayLen( errors )>
<!--- Form data is valid, continue to process the request. --->
</cfif>
<!---
If we made it this far, re-render the input form and display
the errors for the user.
--->
================================================
In the above code, we are processing a form submission that has three
fields (name, email, birthday). If any one of the fields is invalid,
the form cannot be processed properly; however, since the server-side
code is solely responsible for the user experience, it is paramount that
all fields be validated at the same time (to reduce the number of
request-response life-cycles). It is also necessary for the server-side
code to know how to best phrase the error messages as they relate to the
user interface (UI).
The structure of the server side validation
code is byproduct of the server-centric architecture and its tight
coupling to the user interface.
As JavaScript and AJAX have caught
on like wildfire, our browsers have transformed from thin-clients into
thick-client, robust, web application platforms. While our servers still
house our data, business constraints, and security measures, much of
the business logic and user-interaction model has been offloaded to the
client. Server side validation, which we saw above, is now handled
instantly on the client-side using JavaScript:
==================================================
<!DOCTYPE html>
<html>
<head>
<title>Client Side Validation</title>
</head>
<body>
<form>
<ul id="errors" style="display: none ;">
<!-- Errors go here. --->
</ul>
Name: <input type="text" name="name" /><br />
Email: <input type="text" name="email" /><br />
Birthday: <input type="text" name="birthday" /><br />
<input type="submit" value="Submit" />
</form>
<script type="text/javascript" src="../jquery-1.7.js"></script>
<script type="text/javascript">
// Bind to the form submission.
$( "form" ).submit(
function( event ){
// Get the form being submitted.
var form = $( this );
// Get the errors collection.
var errorsList = $( "#errors" )
.empty()
;
// Validate the name.
if (isEmpty( form, "name" )){
errorsList.append(
"<li>Please enter your name.</li>"
);
}
// Validate the email.
if (isEmpty( form, "email" )){
errorsList.append(
"<li>Please enter a valid email.</li>"
);
}
// Validate the birthday.
if (isEmpty( form, "birthday" )){
errorsList.append(
"<li>Please enter a valid birthday.</li>"
);
}
// Check to see if we have any errors.
if (errorsList.children().length){
// Show the errors.
errorsList.show();
// Cancel the form submission.
event.preventDefault();
}
}
);
// I check to see if the given field is empty.
function isEmpty( form, fieldName ){
// Return true if the field is empty.
return( form.find( "input[ name = '" + fieldName + "' ]" ).val() === "" );
}
</script>
</body>
</html>
=========================================================
As you can see here, the name, email, and birthday validation are
handled in realtime using client-side JavaScript as soon as the user
submits the form. It is only after the client-side code has validated
the data that the form is actually submitted to the server.
For
security concerns, and for data that simply cannot be validated on the
client, it is still critically important to have server side validation.
However, with the application of client side validation, we can start
to significantly simplify the way our server-side code works.
If
you look at the code in our server-side-only validation model (the first
example), there are several aspects that become irrelevant in a world
with client side validation:
- We need to validate all form fields in order to limit the number of request-response life-cycles.
- Our error messages have to be user-friendly and have to relate directly to the user interface (UI) in which they will be displayed.
- Our server-side processing code needs to re-render the page in order to display the error messages.
When
data validation is offloaded to the client in a thick-client web
application, handling the above concerns on the server-side is
sub-optimal and redundant. Instead, we can keep the concerns of our
server-side code narrowly focused and decoupled form the user interface /
user experience:
=====================================================
<!--- Param the form values. --->
<cfparam name="form.name" type="string" default="" />
<cfparam name="form.email" type="string" default="" />
<cfparam name="form.birthday" type="string" default="" />
<!--- Create a default API response. --->
<cfset response = {} />
<cfset response[ "success" ] = true />
<cfset response[ "code" ] = "200" />
<cfset response[ "data" ] = "" />
<cfset response[ "error" ] = "" />
<!--- Try to process the form data. --->
<cftry>
<!--- Validate the name. --->
<cfif !len( form.name )>
<cfthrow
type="BadRequest"
message="Name is required."
/>
</cfif>
<!--- Validate the email. --->
<cfif !isValid( "email", form.email )>
<cfthrow
type="BadRequest"
message="Email is required (and must be valid)."
/>
</cfif>
<!--- Validate the birthday. --->
<cfif !isNumericDate( form.birthday )>
<cfthrow
type="BadRequest"
message="Birthday is required (and must be valid)."
/>
</cfif>
<!--- ..... --->
<!--- Form data is valid - continue to process request. --->
<!--- ..... --->
<!--- Catch bad request exceptions. --->
<cfcatch type="BadRequest">
<!--- Flag the response as a failure. --->
<cfset response.success = false />
<cfset response.code = "400" />
<cfset response.error = cfcatch.message />
</cfcatch>
</cftry>
<!--- Return the API response back to the client. --->
<cfcontent
type="text/x-application-json"
variable="#toBinary( toBase64( serializeJSON( response ) ) )#"
/>
===================================================
As we start building client side validation into our thick-client web
applications, it is tempting to make the client-side logic a direct
mirroring of the server-side logic

How to Validate Forms
Take for example the following code fragment:
- <script type="text/javascript" language="javascript"> <br>
- function validateMyForm() { <br>
- if (parseInt(document.forms[0].phone.value) <br>
- != document.forms[0].phone.value) { <br>
- alert('Please enter a phone number, numbers only'); <br>
- return false; <br>
- } <br>
- <br>
- return true; <br>
- } <br>
- </script> <br>
- <br>
- <form action="handler" onsubmit="return validateMyForm();"> <br>
- <p>Phone: <input type="text" id="phone" name="phone" /></p> <br>
- <br>
- <p><input type="submit" value="Send" /></p> <br>
- </form>
What’s wrong here? Well, if you add another form before this one, the code will try to validate the wrong form.
A better approach would be to include a form name:
- function validateMyForm() { <br>
- if (parseInt(document.forms.myForm.phone.value) <br>
- != document.forms.myForm.phone.value) { <br>
- <br>
- <form id="myForm" name="myForm" action="handler" <br>
- onsubmit="return validateMyForm();">
This
is definitely better, but still not portable enough — if you want to
reuse some of this validation on another form, you’ll have to do a lot
of text replacing first.
So let’s remove the form name:
- function validateMyForm(form) { <br>
- if (parseInt(form.phone.value) != form.phone.value) { <br>
- <br>
- <form action="handler" onsubmit="return validateMyForm(this);">
This last method makes use of the object
this, which always points to the current object. This makes our code more portable, and saves typing.
Now
how about making visitors’ lives a lot easier? Let’s focus on the field
that triggered the error, instead of making them find it on their own.
- function validateMyForm(form) { <br>
- if (parseInt(form.phone.value) != form.phone.value) { <br>
- alert('Please enter a phone number, numbers only'); <br>
- form.phone.focus(); <br>
- form.phone.select(); <br>
- return false; <br>
- }
With
these changes, the browser will focus on the incorrectly filled out
field, and even select the text for the visitor. If scrolling is needed,
this will also happen automatically.
Ok,
that was pretty good, but don’t you feel that it’s a little too much
code for every field? What if we create a simple library of functions
that can save lots of typing and download time for the page? Well, next
we’ll do exactly this — and we’ll define our basic functions, to make
the validation code even shorter.
- function validateNumber(field, msg, min, max) { <br>
- if (!min) { min = 0 } <br>
- if (!max) { max = 255 } <br>
- <br>
- if ( (parseInt(field.value) != field.value) || <br>
- field.value.length < min || field.value.length > max) { <br>
- alert(msg); <br>
- field.focus(); <br>
- field.select(); <br>
- return false; <br>
- } <br>
- <br>
- return true; <br>
- }
This
function performs the simple validation of a number — it checks whether
the field contains digits only, and optionally, if it is within a given
range. You’ll note that this code passes the error message as a
parameter. To use such a function, we can basically add it to the
onsubmit handler, like so:
- <form action="handler" <br>
- onsubmit="return validateNumber(this.phone, <br>
- 'Please enter a phone number, numbers only', 5, 10);">
Called
like this, it will check whether the phone number is numeric, and is
more than 5, but less than 10 digits long. Note how the phone object is
passed as a parameter? This allows us to focus upon it via the helper
function, as opposed to passing the value of the field only.
Another
method for validating numbers is to require them to be within a given
range. To make the function do this kind of validation, simply change
the check line to:
- if ((parseInt(field.value) != field.value) || <br>
- field.value < min || field.value > max) {
If
you want to apply more than one check to the form, you can embed
several rules in the onsubmit handler. Imagine, for example, that we
require first and last name to be entered, in addition to the phone
number:
- <form action="handler" <br>
- onsubmit="return ( <br>
- validateNumber(this.phone, 'Please enter a phone <br>
- number, numbers only', 5, 10) && <br>
- validateString(this.firstName, 'Please <br>
- enter your first name', 3, 15) && <br>
- validateString(this.lastName, 'Please <br>
- enter your last name', 3, 15) <br>
- );">
The code requires all validation rules to evaluate to
true (with the logical AND - &&).
A closer look reveals that it’s very easy to generate this kind of code
from a server scripting language… but that’s a whole other article.- function validateString(field, msg, min, max) { <br>
- if (!min) { min = 1 } <br>
- if (!max) { max = 65535 } <br>
- <br>
- if (!field.value || field.value.length < min || <br>
- field.value.max > max) { <br>
- alert(msg); <br>
- field.focus(); <br>
- field.select(); <br>
- return false; <br>
- } <br>
- <br>
- return true; <br>
- }
As
you can see, the string validation function looks more or less the
same; you can also write other functions and combine them with these.
A
common field required in many forms on the Web is the user’s email
address. I’ve seen a lot of functions to do this, but usually the
simplest and easiest way to validate an email address is to use regular
expressions.
Now we’ll extend our function, making it possible to define the field as optional.
- function validateEmail(email, msg, optional) { <br>
- if (!email.value && optional) { <br>
- return true; <br>
- } <br>
- <br>
- var re_mail = /^([a-zA-Z0-9_\.\-])+\@(([a-zA-Z0-9\-])+\.)+ <br>
- ([a-zA-Z])+$/; <br>
- if (!re_mail.test(email.value)) { <br>
- alert(msg); <br>
- email.focus(); <br>
- email.select(); <br>
- return false; <br>
- } <br>
- <br>
- return true; <br>
- }
To validate a required email you should call it as:
and if you want it to be optional:
- validateEmail(this.email, 'Please enter a correct <br>
- email address or leave the field blank', true)
JavaScript
cannot be used on its own for validation, but it helps a lot if you
have it. The more compact the code you embed into your HTML, the better —
it saves download time, and search engines will like you for it!


0 comments:
Post a Comment